Introduction
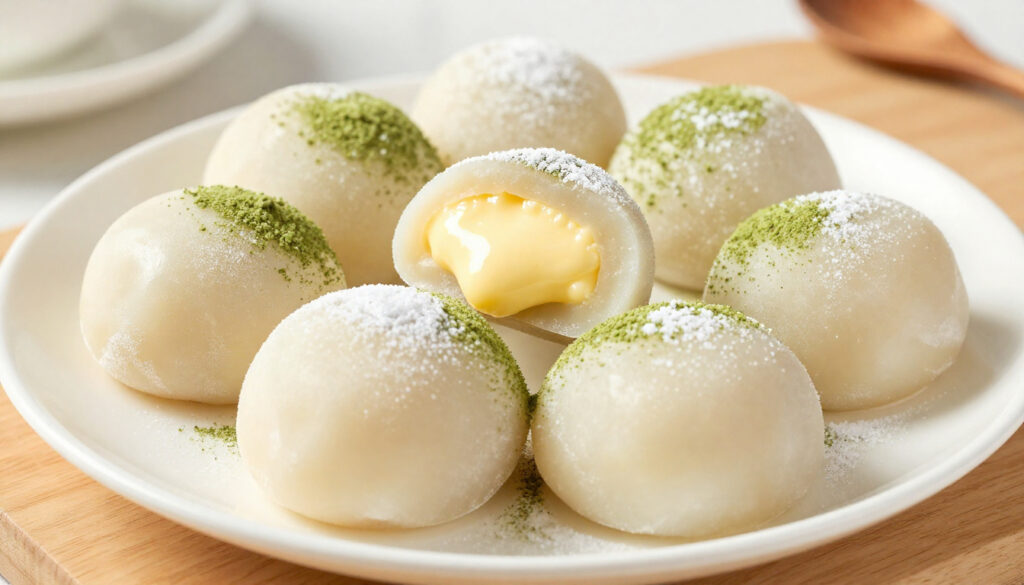
Easy creamy custard mochi balls dessert are a delightful way to experience the magic of mochi without complicated techniques or hard-to-find ingredients. These little spheres deliver a texture combination that’s simply irresistible—a soft, chewy mochi exterior that gives way to creamy, dreamy custard inside. It’s the kind of dessert that feels fancy enough to impress but simple enough for weeknight cravings.
Mochi has become more popular in recent years, and once you taste homemade custard mochi balls, you’ll understand why. They’re nothing like the dense, artificial versions from some shops. These are fresh, tender, and made with real ingredients you can pronounce. The best part? They come together in about 30 minutes, and most of that is just waiting time.
This easy homemade custard mochi balls dessert works for so many occasions. A special treat for yourself on a random Tuesday evening, an impressive dessert when you’re hosting dinner, a fun activity to make with kids in the kitchen, or a gift for friends who appreciate something homemade. Whether you’re familiar with Asian desserts or discovering mochi for the first time, this recipe welcomes everyone.
Why You’ll Love This Recipe
- Takes just 30 minutes from start to finish—perfect for unexpected dessert cravings
- Uses simple, accessible ingredients from any grocery store
- Creates a soft, chewy texture that melts in your mouth
- The creamy custard filling is rich but not overpowering
- Can be made ahead and stored for several days
- Naturally vegetarian and impressive to serve at gatherings
- No special equipment or baking skills required
Ingredients (Makes 12–16 mochi balls, serves 4–6)
For the Mochi:
- 1 cup mochiko flour (also called sweet rice flour)
- ½ cup granulated sugar
- 1 teaspoon vanilla extract
- ¾ cup milk (whole milk works best)
- ¼ teaspoon salt
- 1 tablespoon cornstarch or potato starch (for dusting)
For the Custard Filling:
- 1 cup heavy cream
- ½ cup whole milk
- 4 large egg yolks
- ¼ cup granulated sugar
- 1 tablespoon all-purpose flour
- 1 teaspoon vanilla extract
- Pinch of salt
For Serving:
- Powdered sugar for dusting
- Matcha powder (optional, for garnish)
- Fresh fruit like strawberries or raspberries (optional)
Substitution Ideas:
- Use almond milk or coconut milk for dairy-free custard
- Make it matcha-flavored by adding 1 teaspoon matcha powder to the mochi dough
- Use sweetened condensed milk in place of regular milk for richer flavor
- Create chocolate custard by adding 2 tablespoons cocoa powder to the filling
- Skip the custard and fill with fresh whipped cream for a lighter version
Equipment Needed
- Medium mixing bowl
- Whisk or fork
- Microwave-safe bowl
- Saucepan (for custard)
- Thermometer (optional but helpful)
- Silicone spatula
- Cutting board
- Parchment paper
- Baking sheet
- Piping bag or small spoon (for filling)
Step-by-Step Instructions: How to Make Easy Creamy Custard Mochi Balls
Make the Custard First (10 minutes)
Start with the custard because it needs time to cool before filling. In a saucepan, combine heavy cream and milk, heating gently over medium heat until small bubbles form around the edges. Don’t boil it—you just want it hot.
In a separate bowl, whisk together egg yolks, sugar, flour, vanilla, and salt until well combined. Slowly pour about ¼ of the hot cream mixture into the egg mixture while whisking constantly. This tempers the eggs so they don’t scramble. Once that’s combined, pour the egg mixture back into the saucepan with the remaining cream.
Continue cooking over medium heat, stirring constantly with a silicone spatula, until the mixture thickens and coats the back of a spoon. This takes about 5 minutes. Pour into a bowl and let cool completely. You can speed this up by placing the bowl in an ice bath for 10 minutes or refrigerating while you make the mochi.
Prepare the Mochi (8 minutes)
In a microwave-safe bowl, whisk together mochiko flour, sugar, vanilla extract, milk, and salt until you have a smooth batter with no lumps. The consistency should be like thick pancake batter.
Microwave this mixture for 2–3 minutes, stirring halfway through. The mochi will start out shiny and wet, then gradually become opaque and thick as it cooks. When it’s done, it should be hot and sticky but hold its shape. Let it cool for about 3 minutes until you can handle it.
Shape the Mochi (8 minutes)
Dust your work surface generously with cornstarch or potato starch—this prevents sticking and makes handling much easier. Turn the warm mochi dough out onto the starched surface. It will be quite sticky, so dust it generously on top as well.
Using a knife dipped in cornstarch, cut the mochi dough into 12–16 equal pieces. Take one piece and flatten it in your palm to create a small disc. Place about 1 teaspoon of cooled custard in the center, then fold the edges up and around the filling, pinching gently to seal. Roll between your palms to smooth out the outside and create a ball.
Place finished mochi balls on a parchment-lined baking sheet and dust lightly with cornstarch. Repeat with remaining pieces.
Chill Before Serving (5 minutes minimum)
Refrigerate the mochi balls for at least 15 minutes—longer is even better. This firms them up and makes them easier to handle and eat. You can keep them in the fridge for up to 4 days.
Just before serving, dust with powdered sugar or matcha powder if desired. Serve chilled or at room temperature, depending on your preference.
Expert Tips for Perfect Results
Don’t skip tempering the eggs. Adding hot liquid slowly while whisking prevents scrambled eggs in your custard. It’s a simple but important step for smooth, creamy filling.
Stir the mochi constantly while cooking. This ensures even cooking and prevents lumps from forming. Don’t set it and forget it.
Use cornstarch generously. Mochi is naturally sticky. More starch on your work surface means easier shaping and less frustration.
Cool the custard completely. Warm custard makes the mochi sticky and hard to work with. Cold custard is much easier to handle.
Don’t overfill. A teaspoon of custard is plenty. Too much filling makes the mochi burst when you shape it.
Chill before serving. Cold mochi balls are easier to eat and have a better texture. Warm ones can be too soft and sticky.
Variations on This Easy Custard Mochi Balls Recipe
Matcha Mochi Balls: Add 1 teaspoon matcha powder to the mochi dough for a delicate green tea flavor.
Chocolate Custard Version: Mix 2 tablespoons cocoa powder into the custard filling for rich chocolate mochi.
Strawberry Cream: Fill with whipped cream mixed with strawberry jam instead of custard for a fruity twist.
Coconut Mochi: Use coconut milk in the mochi dough and top with toasted coconut flakes.
Almond Custard: Add almond extract to the custard filling and sprinkle crushed almonds on the outside.
What to Serve With Easy Creamy Custard Mochi Balls
Fresh Fruit Compote: Serve alongside a warm berry compote for added flavor and elegance.
Hot Tea: Perfect pairing with green tea, oolong, or jasmine tea for an afternoon treat.
Light Fruit Sauce: Drizzle with passion fruit sauce, raspberry coulis, or mango puree.
Ice Cream Pairing: Serve mochi balls next to vanilla or matcha ice cream for an interesting texture contrast.
Whipped Cream Dollop: A simple dollop of whipped cream adds richness without overwhelming.
Pairs well with: Dinner party desserts, afternoon tea gatherings, special occasions, Asian-inspired meals, and dessert parties.
Storage and Reheating Tips
Fresh: Best enjoyed within a few hours of making for the softest texture.
Refrigerator: Store in an airtight container for up to 4 days. The mochi will remain soft and chewy.
Freezing: Freeze on a baking sheet for 2 hours, then transfer to freezer bags for up to 1 month. Thaw in the refrigerator before serving.
No Reheating Needed: These are best served cold or at room temperature, not heated. The mochi becomes tough when warmed.
Food Safety: Use pasteurized eggs if possible for safety with custard. Store in the refrigerator at 40°F or below. Consume within 4 days.
Frequently Asked Questions
Can I use store-bought custard? Yes! Vanilla pudding mix or canned custard can work in a pinch, though homemade tastes fresher and better.
What if my mochi is too sticky to work with? Use more cornstarch on your hands and work surface. If it’s still difficult, refrigerate the dough for 30 minutes before shaping.
Can I make these ahead? Absolutely! Make them up to 4 days ahead and store in the refrigerator. They actually taste better after sitting.
Are these gluten-free? Yes! Mochiko flour is gluten-free. Just make sure your other ingredients are certified gluten-free.
Can I use raw eggs for the custard? Not recommended. Use pasteurized eggs or heat the custard to 160°F for safety.
Nutrition Information (Per Mochi Ball)
Based on 16 mochi balls
- Calories: 140–160
- Fat: 7–8g
- Carbohydrates: 17–19g
- Fiber: 0g
- Protein: 2–3g
- Sodium: 35–45mg
Note: Nutrition varies based on filling amount. This is an estimate.
Quick Recipe Card Summary
Easy Creamy Custard Mochi Balls Dessert
Prep Time: 15 minutes Cook Time: 15 minutes Chill Time: 15 minutes Total Time: 45 minutes Servings: 4–6 (makes 12–16 balls) Calories per ball: ~150
Ingredients:
For Mochi:
- 1 cup mochiko flour
- ½ cup granulated sugar
- 1 teaspoon vanilla extract
- ¾ cup milk
- ¼ teaspoon salt
- 1 tablespoon cornstarch (for dusting)
For Custard:
- 1 cup heavy cream
- ½ cup whole milk
- 4 large egg yolks
- ¼ cup granulated sugar
- 1 tablespoon all-purpose flour
- 1 teaspoon vanilla extract
- Pinch of salt
Quick Instructions:
- Make custard: Heat cream and milk. Temper egg yolks with hot liquid. Cook on stove 5 minutes until thick. Cool completely.
- Make mochi: Mix mochiko, sugar, vanilla, milk, and salt in microwave-safe bowl. Microwave 2–3 minutes, stirring halfway.
- Cool mochi 3 minutes on starched surface.
- Cut into pieces and flatten each one. Fill with 1 teaspoon custard.
- Fold edges and roll into ball. Dust with cornstarch.
- Chill 15 minutes before serving.
- Dust with powdered sugar and serve cold.
Easy creamy custard mochi balls dessert are proof that simple ingredients and basic techniques can create something truly special. These little bites deliver a restaurant-quality experience without any complicated fussing around. Once you master the basic technique, you’ll find yourself making them regularly for family, friends, and yourself.
The magic of mochi is that delicate texture—soft and chewy on the outside, creamy and luscious on the inside. Every bite feels a little bit like a treat, even though you made it yourself in your own kitchen. That’s the kind of dessert worth making again and again.
Whether you’re exploring Asian desserts for the first time or adding to your repertoire of homemade treats, this recipe delivers without fail. Your loved ones will taste the care you put into making something fresh and delicious from scratch. And you’ll know exactly what goes into every single bite.