Packing school lunches day after day becomes a frustrating routine when you’re cycling through the same boring sandwiches and uninspired leftovers. Kids lose interest, lunches come home uneaten, and you’re left feeling like you’ve wasted time and money preparing something your child won’t touch. The pressure to pack something healthy, appealing, and quick enough to prepare on busy school mornings is genuinely overwhelming. Yet school lunches are crucial for your child’s nutrition, energy levels, and ability to concentrate during the afternoon. These five school lunch ideas prove that you don’t have to spend hours preparing elaborate meals to send something your kids actually enjoy eating. Each recipe comes together in 20 minutes or less, uses wholesome ingredients, travels well in a lunch box, and tastes absolutely delicious—not like healthy food imposed upon reluctant eaters. What makes these school lunch ideas perfect for real family life is their flexibility and kid-appeal. You can prepare components ahead, involve your children in assembly, and customise based on individual preferences. These aren’t trendy Pinterest creations requiring special equipment or hard-to-find ingredients. Instead, they’re practical, genuine meals that nourish growing bodies and brains. Once you master these five school lunch ideas, lunchtime preparation transforms from a daily frustration into something manageable and genuinely satisfying.
1. Build-Your-Own Lunch Boxes with Variety
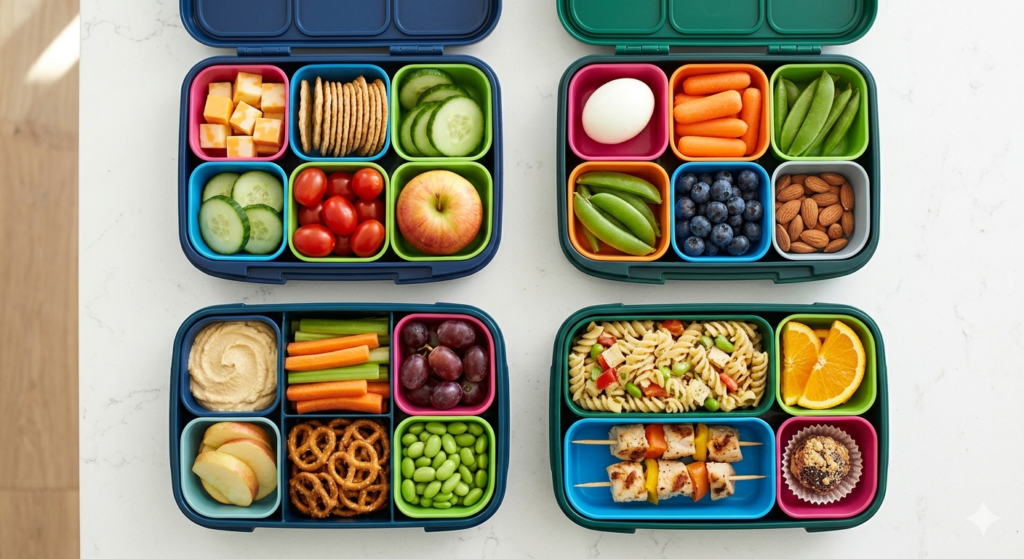
Instead of complicated hot meals, these customisable lunch boxes let kids choose their components and feel involved in their lunch. The variety keeps them interested, and the balanced nutrition ensures they’re well-fuelled for the afternoon.
Ingredients
Protein Options (Choose 1-2)
- Diced cooked chicken breast
- Turkey or ham slices
- Hard-boiled eggs
- Cheese cubes or string cheese
- Hummus with pita chips
- Roasted chickpeas
Grain Options (Choose 1-2)
- Whole grain crackers
- Pita bread or flatbread
- Whole grain bread cubes
- Pasta salad (prepared ahead)
- Rice cakes
- Pretzels
Vegetable and Fruit Options (Choose 3-4)
- Cherry tomatoes
- Cucumber slices
- Carrot sticks or baby carrots
- Bell pepper strips
- Snap peas
- Grapes or blueberries
- Apple slices
- Berries
Extras (Choose 2-3)
- Nuts or seeds
- Dried fruit
- Yogurt dip
- Peanut or almond butter
- Cheese spread
- Honey
Instructions
Prepare all components the night before and store in separate airtight containers. In the morning, gather individual lunch containers (bento boxes work beautifully for this concept). Arrange components in sections so each lunch box includes protein, grains, multiple vegetables and fruits, and fun additions. Let your child help arrange items—involvement means they’re more likely to actually eat what’s packed. These boxes are endlessly customisable based on what you have available and what your child enjoys. The key is including variety so they stay interested throughout the lunch week.
2. Mediterranean Chickpea Wraps
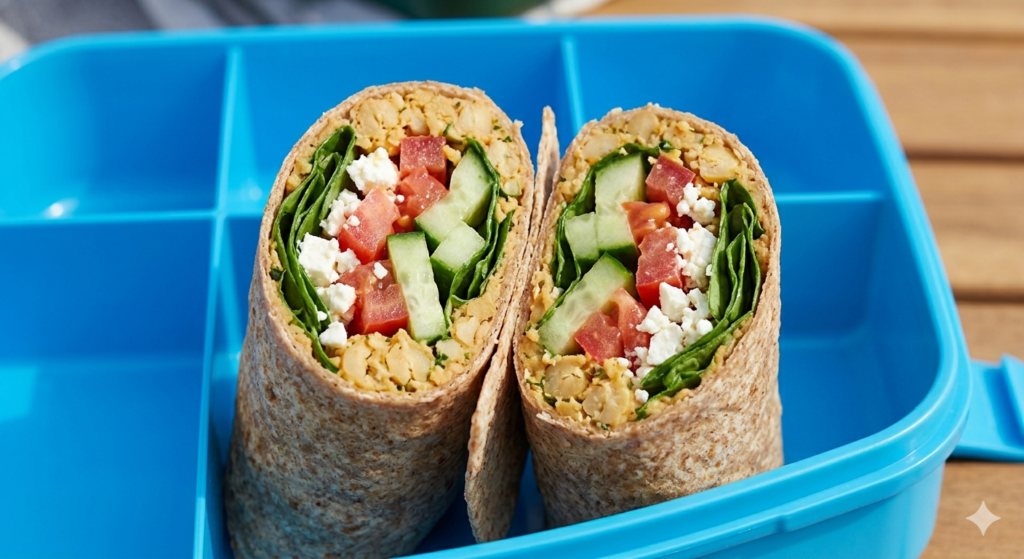
These colourful, protein-packed wraps are quick to assemble, travel beautifully, and taste absolutely delicious. Chickpeas provide plant-based protein and fibre, keeping kids satisfied and focused through the afternoon.
Ingredients
For the Filling
- 1 can (15 ounces) chickpeas, drained and rinsed
- 2 tablespoons olive oil
- 1 tablespoon lemon juice
- 2 cloves garlic, minced
- 1 teaspoon dried oregano
- 1/2 teaspoon cumin
- Salt and black pepper to taste
- 1 cup cherry tomatoes, halved
- 1 cucumber, diced
- 1/2 red onion, finely diced
- 1 cup spinach or lettuce, chopped
- 1/4 cup crumbled feta cheese
For Assembly
- 4 whole wheat or spinach tortillas
- Hummus or tzatziki sauce
- Additional fresh herbs for garnish
Instructions
In a bowl, combine the drained chickpeas, olive oil, lemon juice, minced garlic, oregano, cumin, salt, and pepper. Mash gently—you want some whole chickpeas remaining for texture, not a complete puree. Fold in the cherry tomatoes, diced cucumber, diced red onion, spinach, and feta cheese. Taste and adjust seasonings as needed. To assemble, warm the tortillas slightly to make them more pliable. Spread a thin layer of hummus or tzatziki on each tortilla. Spoon the chickpea mixture down the centre of each tortilla. Roll tightly, tucking in the sides as you go. Wrap in foil or parchment paper for lunch boxes. Pack any extra sauce in a small container on the side for dipping if desired. These wraps taste fresh and delicious when eaten cold and travel beautifully in lunch boxes without getting soggy.
3. Pasta Salad with Vegetables and Grilled Chicken
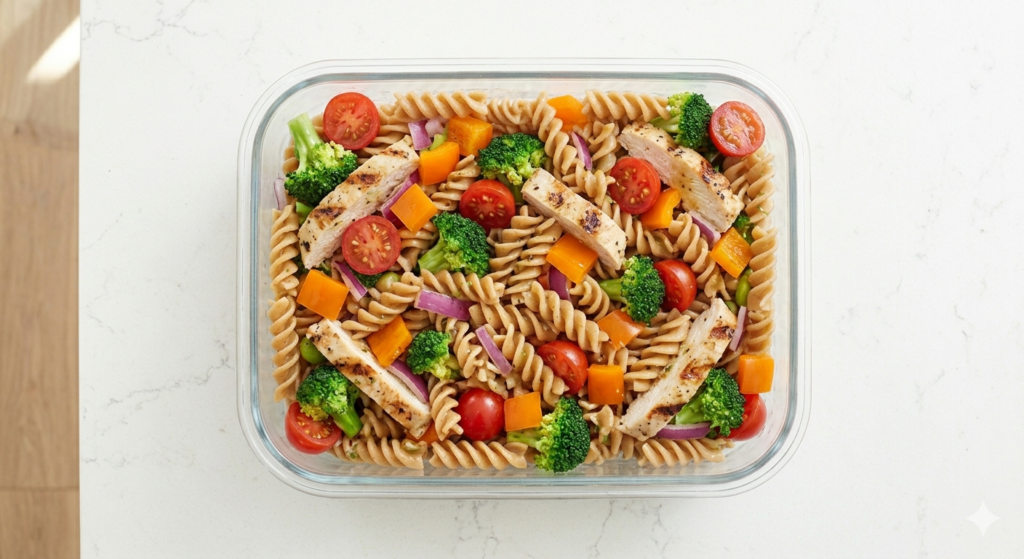
This hearty pasta salad is filling, versatile, and absolutely delicious. Prepare it on Sunday evening and portion into containers for grab-and-go school lunches throughout the week.
Ingredients
For the Pasta Salad
- 8 ounces whole wheat pasta (fusilli or penne)
- 2 cups cooked grilled chicken, diced
- 1 cup cherry tomatoes, halved
- 1 cup cucumber, diced
- 1 red or yellow bell pepper, diced
- 1 cup broccoli florets, lightly steamed
- 1/2 red onion, finely diced
- 1/2 cup corn kernels
- 1/2 cup fresh peas (frozen are fine)
For the Dressing
- 3 tablespoons olive oil
- 2 tablespoons balsamic vinegar
- 1 tablespoon lemon juice
- 2 cloves garlic, minced
- 1 teaspoon dried Italian seasoning
- Salt and black pepper to taste
- Optional: 1 tablespoon honey to balance acidity
Instructions
Cook the pasta according to package directions until al dente. Drain and rinse under cool water to stop the cooking process. In a large bowl, combine the cooled pasta with the diced chicken, cherry tomatoes, cucumber, bell pepper, broccoli, red onion, corn, and peas. In a separate small bowl, whisk together the olive oil, balsamic vinegar, lemon juice, minced garlic, Italian seasoning, salt, and pepper. Pour the dressing over the pasta salad and toss gently until everything is well combined. Taste and adjust seasoning as needed. The salad tastes even better after sitting for a few hours as flavours meld together. Portion into containers and refrigerate for up to 4 days. Pack with a fork and maybe a small container of extra dressing on the side if your child prefers.
4. Homemade Mini Meatballs with Sweet Potato Fries
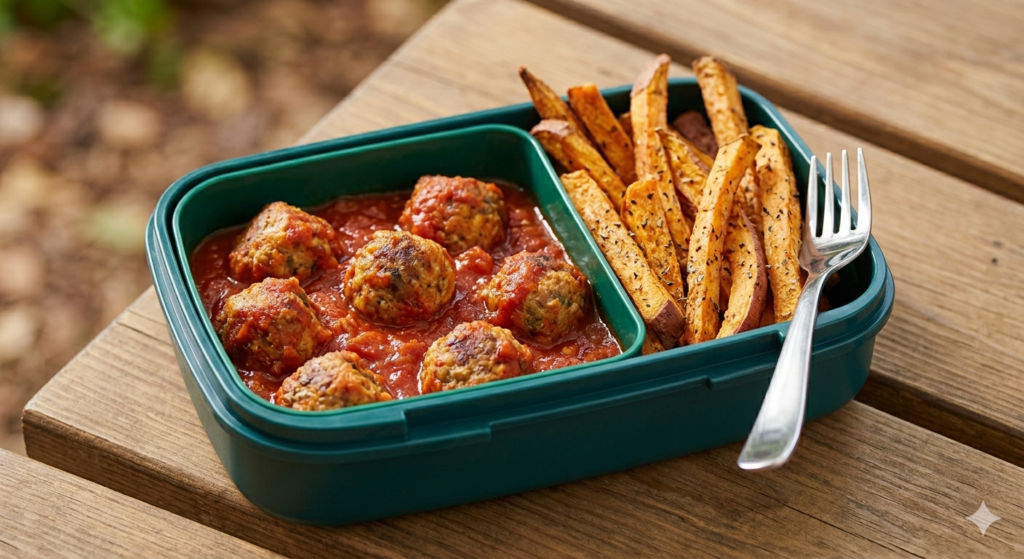
These little meatballs are fun for kids to eat, packed with protein and vegetables, and infinitely better than processed frozen versions. Pair with homemade sweet potato fries for a complete, satisfying lunch.
Ingredients
For the Meatballs
- 1 pound lean ground beef or ground turkey
- 1/4 cup whole wheat breadcrumbs
- 1 egg
- 1/4 cup grated onion
- 2 cloves garlic, minced
- 1/4 cup finely grated zucchini
- 2 tablespoons grated Parmesan cheese
- 1 teaspoon dried Italian seasoning
- Salt and black pepper to taste
- 1 tablespoon olive oil
- 1 cup marinara sauce
For the Sweet Potato Fries
- 2 medium sweet potatoes
- 2 tablespoons olive oil
- 1/2 teaspoon garlic powder
- 1/4 teaspoon paprika
- Salt and black pepper to taste
Instructions
Preheat your oven to 400°F (200°C). Peel and cut the sweet potatoes into fries, toss with olive oil, garlic powder, paprika, salt, and pepper. Spread on a baking sheet and bake for 20-25 minutes until golden and tender. Meanwhile, prepare the meatballs. In a large bowl, combine the ground meat, breadcrumbs, egg, grated onion, minced garlic, grated zucchini, Parmesan, Italian seasoning, salt, and pepper. Form into golf ball-sized meatballs. Heat olive oil in a large skillet over medium-high heat. Working in batches to avoid overcrowding, cook the meatballs for 8-10 minutes, turning occasionally, until golden on all sides and cooked through. Pour the marinara sauce over the cooked meatballs and simmer for 3-4 minutes. Cool completely before packing. Portion into containers with the sweet potato fries on the side. Pack with a small container of sauce if additional sauce is desired. These freeze beautifully and reheat perfectly in the microwave at school if your child has access to one.
5. Chicken Salad Sandwich with Whole Grain Bread
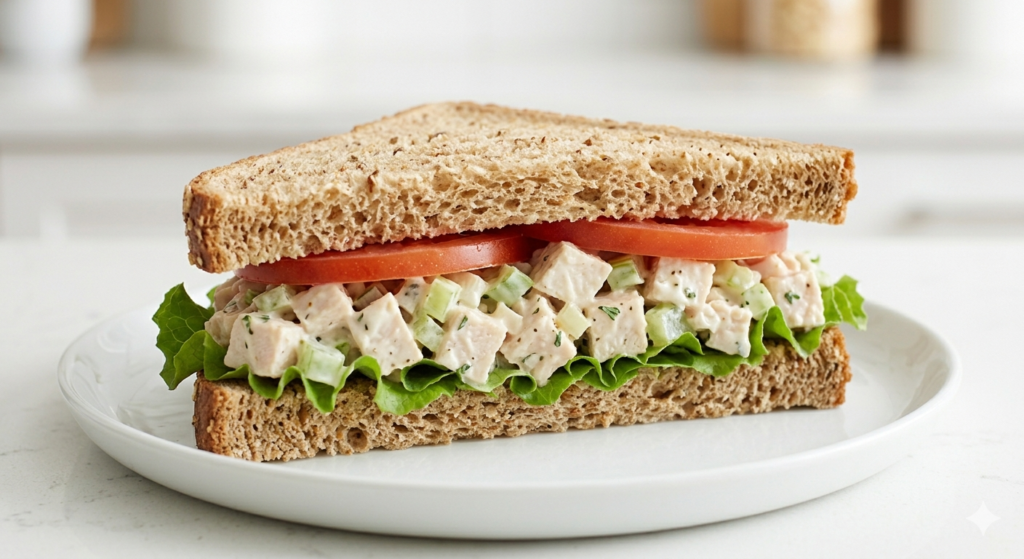
This creamy yet healthy chicken salad is infinitely better than processed lunch meats. The combination of tender chicken, fresh vegetables, and a light mayo-based dressing creates something genuinely delicious that kids actually want to eat.
Ingredients
For the Chicken Salad
- 2 cups cooked chicken breast, diced
- 1/4 cup Greek yogurt
- 2 tablespoons mayonnaise
- 1 tablespoon lemon juice
- 1 celery stalk, finely diced
- 1/4 red onion, finely diced
- 1/4 cup diced apple
- 2 tablespoons sliced almonds
- 1 tablespoon fresh dill or 1/2 teaspoon dried dill
- Salt and black pepper to taste
- Optional: 1 teaspoon honey
For Assembly
- 8 slices whole grain bread
- Fresh lettuce leaves
- Tomato slices
- Additional vegetables like cucumber or bell pepper
Instructions
In a large bowl, combine the diced cooked chicken, Greek yogurt, mayonnaise, and lemon juice. Fold in the diced celery, red onion, apple, sliced almonds, and fresh dill. Taste and adjust seasoning with salt, pepper, and honey if desired. The Greek yogurt keeps this chicken salad creamy whilst reducing overall fat and calories compared to traditional versions. To assemble sandwiches, lay out bread slices. Layer lettuce and tomato on the bottom slice. Spoon the chicken salad generously on top. Top with the second slice of bread. Cut diagonally and wrap in foil or parchment paper. Pack in an insulated lunch box with an ice pack to keep cool. These sandwiches taste best when eaten fresh but can be made the night before if kept cold. The chicken salad also works beautifully in lettuce wraps if your child prefers to avoid bread.
Tips for Packing Appealing School Lunches
Involve Your Child in Meal Planning Let kids choose between healthy options. “Would you prefer pasta salad or chicken wraps this week?” gives them control and increases the likelihood they’ll actually eat what you’ve packed. Kids are far more invested in meals they’ve helped choose.
Use Attractive Containers Lunch boxes and containers come in fun colours and designs. Kids are more likely to enjoy their lunches when they’re presented in something visually appealing. Bento boxes with separate compartments are particularly popular with children.
Include a Variety of Textures Combine crunchy elements (crackers, raw vegetables), soft elements (cheese, hummus), and chewy elements (dried fruit, whole grain bread). This variety makes lunches more interesting and engaging to eat.
Pack Dressings and Sauces Separately Keep dressings, hummus, and sauces in separate small containers so salads and sandwiches don’t get soggy by lunchtime. Kids can apply these themselves, adding an element of control and involvement.
Don’t Forget Hydration Include a water bottle or small juice box. Many kids forget to drink enough water at school, which affects their energy and focus. Hydration matters as much as nutrition.
Avoid Food Boredom Rotate lunches throughout the week so kids don’t get sick of the same thing repeatedly. Use the same basic components but combine them differently. Variety keeps kids interested.
Pack Realistic Portions Too much food overwhelms some kids, whilst too little leaves them hungry. Pack enough for satiety but not so much that it encourages waste. Observe what your child actually eats and adjust accordingly.
Storage and Meal Prep Instructions
Build-your-own lunch boxes work best when assembled in the morning, though components can be prepped the night before. Store components in airtight containers and assemble fresh each morning for maximum freshness.
Mediterranean chickpea wraps keep in the refrigerator for 3-4 days when wrapped tightly. They travel beautifully in lunch boxes and don’t require reheating. The filling actually tastes better the next day as flavours meld.
Pasta salad keeps in the refrigerator for 4-5 days in airtight containers. Prepare on Sunday for grab-and-go lunches throughout the week. The salad tastes fresh and delicious cold—no reheating required.
Mini meatballs and sweet potato fries keep in the refrigerator for 3-4 days. They can be eaten cold or reheated in the microwave if your child has access to one at school. These freeze beautifully for up to one month, making them perfect for batch cooking.
Chicken salad keeps in the refrigerator for 3-4 days in an airtight container. Assemble sandwiches in the morning or the night before. Pack with an ice pack to keep everything cool throughout the day.
Prepare components on Sunday evening for an entire week of school lunches. Cook chicken, prepare pasta salad, make meatballs, and prepare chicken salad so weekday mornings involve only quick assembly. This prep-ahead strategy saves significant time and stress.
Frequently Asked Questions
What if my child has food allergies? These recipes are easily adaptable. Substitute peanut or tree nut butters with seed butters if needed. Replace chicken with turkey, beef, or plant-based proteins. Use dairy-free alternatives for cheese and yogurt. Whole grains like quinoa or rice work instead of pasta. Always carefully read labels for hidden allergens and consult your child’s doctor about safe substitutions.
How do I keep food cold in a lunch box without an ice pack? Freeze water bottles the night before and use as ice packs—they keep lunch cold and provide drinking water as they melt. Pack cold items in insulated lunch boxes designed to maintain temperature. Include foods that don’t spoil easily if they warm up slightly, like whole fruits, nuts, and crackers.
Can I prepare lunches for the entire week on Sunday? Yes, absolutely. Prepare components like cooked chicken, pasta salad, and chicken salad on Sunday. Store in airtight containers. Assemble actual sandwiches and wraps in the morning or the night before to prevent sogginess. Build-your-own boxes and meatballs keep beautifully for the full week.
What if my child refuses vegetables in their school lunch? Include vegetables in forms they prefer—raw and crunchy, roasted and soft, or mixed into salads and sauces where they’re less obvious. Keep offering vegetables without pressure. Many kids accept new foods after repeated exposure. Make vegetables interesting by involving your child in shopping and preparation.
Are these lunches suitable for children with specific dietary requirements? Most of these recipes are naturally vegetarian-adaptable by substituting plant-based proteins. They’re gluten-free when using appropriate bread or wraps. They work for various allergy restrictions with thoughtful ingredient substitutions. Consult with your child’s doctor or a nutritionist for specific dietary requirements.